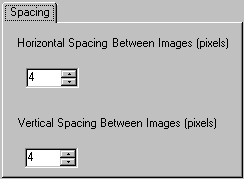
 The values for horizontal and vertical spacing are set
by default to 4 pixels,
but can be set to any value from 0 to 100. They have no effect when you
are simply dragging images around the screen, but they do have an effect
when:
The values for horizontal and vertical spacing are set
by default to 4 pixels,
but can be set to any value from 0 to 100. They have no effect when you
are simply dragging images around the screen, but they do have an effect
when:The Spacing, Background & Edge Handling window, selected from the main window's Tools menu, allows you to control what appears behind and between the images in a composition, and how the images blend with each other and with the background. A very persistent beta tester pointed out that the first release of Easel didn't pay much attention to this aspect of a composition. I listened (eventually), and the features implemented here are the result. Horizontal and vertical spacing determines the space left between images, if any, when you use some of Easel's sizing and positioning techniques. The background settings determine if the space between images is left blank, colored, or filled with an image. The edge handling settings determine if image edges are blended with each other, with the background, or left alone.
Note 1: If you are working on a composition when this window appears, your settings will affect only that composition (and their effect will be shown immediately if the Preview box is checked). If no composition is loaded, your settings will become the new defaults, to be inherited whenever you start a new composition.
Note 2: This window also appears when you click the Set Spacing... button on the Sizing & Tiling window.
The values for horizontal and vertical spacing are set
by default to 4 pixels,
but can be set to any value from 0 to 100. They have no effect when you
are simply dragging images around the screen, but they do have an effect
when:
you hold down the Ctrl key and drag an image up against another one
you crop an image to fit a space using fill-the-hole cropping
you use the precision alignment tool to move, size, and/or crop images
you use the sizing and tiling tools or auto arrange to move and/or size images
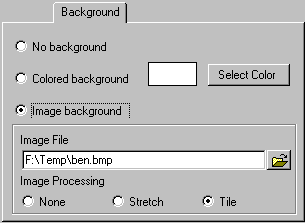 The background of a composition can be left blank, filled
with color, or assigned an image that can be stretched or tiled to fill
the page.
The background of a composition can be left blank, filled
with color, or assigned an image that can be stretched or tiled to fill
the page.
For color, check Colored Background and click Select Color for a color selection dialog. Your choice will be shown in the box.
For an image, check the box, click the folder icon to select an image file stored on disk, and configure Easel to display it as is or to stretch or tile it to fill up the page.
While your background selection mostly affects the spaces between images, it shows through if you have assigned any transparent colors. It will also affect image edges (see below) if you opt to have them faded into the background.

Easel recognizes and handles separately 3 kinds of edges: joined edges, margin edges, and unjoined edges.
Joined edges are parallel edges of adjacent images that are close enough, as determined by the Maximum Joint Width setting, to be considered "joined."
Margin edges are edges adjacent to and less than or equal to the Maximum Joint Width distance from the margins.
Unjoined edges are what's left, too distant from other edges to be joined edges and too distant from margins to be margin edges.
If you have defined a background color or image, Easel can fade any or all of these types of edges into it. When images have joined edges, they can also be blended into each other. In either case, the particulars are controlled by settings on the Advanced tab. Click here to see a comparison of blended vs. unblended edges.
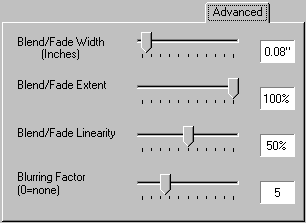
The settings here are all labelled Blend/Fade because they apply to both blending of images and fading them into the background. In each case, there is a starting point in an image and an end point in the background, each with a specific color. What Easel does is create a transition of colors from the start to the end. The only difference between blending images and fading into the background is the end point -- to fade, it's just a point in the background, while to blend it is an average of the starting points in the 2 images to be blended.
This setting determines how far in from the edge of each image Easel locates the starting point. Greater values = a wider zone of blending/fading.
Extent determines the completeness of the transition, i.e. at the end point the color is now this percent of what it is "supposed" to be. The default value is 100%, but there may be instances where lesser values provide a better look. Experiment.
Linearity determines the "shape" of the transition.