Fill-the-hole cropping, a special case of constrained cropping, is a nifty composing tool that lets you easily crop and resize an image to fit precisely into a particular space.
FTH cropping is toggled off and on by selecting Tools on the main menu, then Fill-the-Hole Cropping Mode on the tools menu. You can also turn it off and on via the cropping constraint menu. Like all constrained cropping modes, once turned on FTH mode applies to all subsequent cropping operations until you turn it off. When active, the Fill-the-Hole Cropping Mode entry on the tools menu is checked, and the FTH cursor appears when you start to crop.
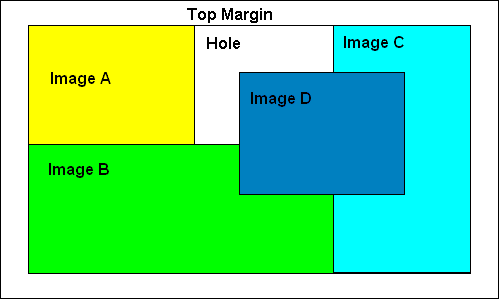
How exactly does it work? Consider the figure, showing a composition with 4 images. Images A, B, and C have been fitted together, with image D remaining. We want to fit image D into the remaining hole, defined by A on the left, the margin at top, C on the right, and B at bottom.
With fill-the-hole mode, it takes three steps to do so:
Use the tools menu to turn on FTH cropping mode;
Use the mouse to drag image D so that its top left corner, as shown, is in the hole you want to fill;
Right click image D to get the image menu, select Crop / Rectangle, then drag a cropping rectangle on image D. As you drag the mouse, the rectangle will be constrained to the same aspect as the hole. When you complete the crop by releasing the mouse button, Easel will instantly crop image D to the right shape, resize it to the right size, and relocate it to the right place.
FTH cropping is very quick and easy to use, but there are 2 things to keep in mind when using it:
Before starting to crop, positioning the image to be cropped in the right place is crucial. The example shown is simple, but you will sometimes encounter more complicated holes with multiple objects along each edge. All that matters is the position of the upper left corner of the image -- the hole that will be filled is defined by the edges of whatever lies exactly to the left, top, right and bottom of this point.
For any given hole to be filled, the exact size, shape and location of the cropped image will be determined by whatever values are currently set for horizonal and vertical spacing. If these values (set by clicking Spacing on the tools menu) are 0, the image will be cropped and resized to the exact shape and size of the hole and positioned directly adjacent to the abutters. If they were set to 10, for example, the image would be cropped and resized to be 20 pixels narrower and 10 pixels shorter (because the top edge is the margin), and would be centered horizontally in the hole and located vertically starting at the top margin.