Sizing and Tiling Tools
Easel's sizing and tiling tools provide quick and easy methods to help
you arrange multiple images. You will probably find them more useful for
starting rather than finishing arrangments, and most useful when working
with a large number of images (say 20+). See
auto arrange for info about completely
automated arrangements.
All of the S&T tools are grouped together on a 3-tabbed window,
accessed by selecting
on the main menu, or by clicking the sizing and tiling icon on the toolbar. Tool capabilities include
3 size equalization techniques, size distribution, and automated layout
that can iteratively resize and tile in search of the best fit.
If any images are selected when the you open the S&T window , all
S&T tools offer the option of working only on selected images. If
none are selected, the tools work on all images in the composition.
Size Equalization
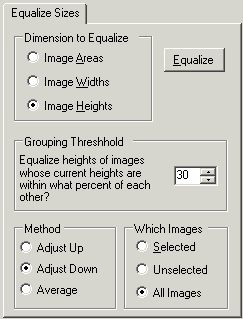 The tools on the
tab can equalize the areas, widths or heights of all or selected images.
The purpose of equalizing areas is to give each image equal weight in
the composition, while the purpose of equalizing dimensions is to make
them easier to arrange -- when images have equalized dimensions, it's
easy to align them in rows or columns.
The tools on the
tab can equalize the areas, widths or heights of all or selected images.
The purpose of equalizing areas is to give each image equal weight in
the composition, while the purpose of equalizing dimensions is to make
them easier to arrange -- when images have equalized dimensions, it's
easy to align them in rows or columns.
Area equalization is the simplest; when
is selected, Easel will compute and display the total printable area,
the number of images, and the unit area for each image. When you click
the button, the images are resized
accordingly.
When or is selected, Easel displays 2 additional settings that
affect the results: the ,
a percentage between 0 and 100, and ,
which can be or. When you click ,
Easel compares the selected dimension of each image to all others, computing
the difference as a percentage, and if the difference is less than or
equal to the grouping threshhold, flagging it for adjustment. When all
images have been checked, those flagged are adjusted as a group per the
selected method and resized to match the smallest, largest or group average.
Size Distribution
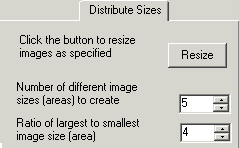 Size distribution is just the opposite of equalization:
it makes images different sizes, in a systematic way. You set two parameters
-- the number of different sizes to create, and the ratio of the smallest
to the largest - click , and Easel generates
the distribution.
Size distribution is just the opposite of equalization:
it makes images different sizes, in a systematic way. You set two parameters
-- the number of different sizes to create, and the ratio of the smallest
to the largest - click , and Easel generates
the distribution.
Size distribution can come in handy when you have many identically sized
pictures and want to create some variety.
Tiling
The tiling tool rearranges images. The manner in which it does so depends
upon several settings, and varies from simple to complex. The settings
control sequence, spacing, resizing, and iterations, and their values
interact.
For the simplest rearrangment, leave
unchecked and set to
1 and to .
When you then click the button, Easel
will arrange the images by stepping through them in the order they were
added and, starting at the upper left corner, tile them working across
and down with the space between them determined by your current
spacing setting. If there is not enough room to fit all of the images,
Easel will shrink them all by the same percentage until they do.
If you now check the box and
click , Easel does pretty much the same
thing, except that it steps through the images in a random sequence. If
your images are all the same size and shape, this will have no effect,
but if they vary it will make a difference in the tiling pattern and perhaps
the need to shrink things to fit.
Now that you've got checked,
make things more interesting by increasing the number of iterations from
1 to 1000 (to do so, click in the box and type the number), then click
. What happens? You won't see it, but
Easel will indeed compute the tiling 1000 times, using a different sequence
each time. Each time it completes the tiling job, it calculates the percentage
of the total area covered with images rather than white space, and when
1000 iterations are complete, it restores the tiling job with the best
coverage and tells you what it is. Neat, huh?
Incidentally, you can set the
number of iterations greater than 1 without checking the box, but it's pointless: without randomness (or resizing,
discussed next) the outcome of all iterations will be identical.
Simultaneous Sizing and Tiling
Easel can combine its resizing and tiling capabilities in the quest
for better coverage. It does so by "nesting" iterative tiling
inside iterative, randomized resizing. What this means in plain English
is that Easel can repeat the resizing process as many times as you want,
stepping through the images in a different order each time (which varies
the result); after each resize, it steps through the tiling process as
many times as you want. Easel computes the coverage ratio for each resize/tile
combination and as before, restores the best one when all iterations are
complete.
As you would expect, the resulting arrangements are influenced by the
resizing method selected, with those produced by equalization having similarly
sized images and those produced by distribution more of a range. There
is enough randomness in the iterations, however, to make the results less
disparate than you might expect.
I was going to say that it's usually easier to manually finish up an
equalized version, because of the similarity of image sizes. However,
when I ran through the example below, I discovered that Easel's precision
alignment tool obliterated any difference -- when using it, getting
rid of the rough edges took 10 minutes in both cases.
Note: When Easel performs resizing
and tiling together, it uses the current resizing settings (eg for equalization,
for distribution), even though they are not visible on the tiling tab.
Don't forget to check the values before clicking .
Now let's run through an example.
Example
To get started, I selected from
the main menu, configured the page and clicked .
Then I clicked the button on the
and chose 21 images from our recent vacation in the canyonlands. Finally,
I rectangle
cropped almost all of them to focus on the most interesting portions,
and dragged them around on the page, as shown in Figure 1. Then I saved
the file.
Tip: Cropping your images before
arranging them is a smart thing to do, and Easel makes it an easy thing
to do. If you don't crop, a) you end up with a lot of boring background
material, and b) your arrangement will be a monotonous affair of similar
rectangles. Don't hesitate to crop!
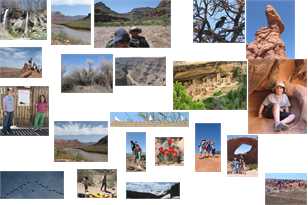
Figure 1: A bunch of cropped imaged spread around the page
For the first test, I selected
as the resizing method, set the method to , checked , and specified
20 resizing and 5000 tiling iterations. I clicked the button and set both horizontal and vertical spacing
to 4 pixels. When I clicked , the 100,000
iterations took a minute or so, with the result shown in Figure 2:
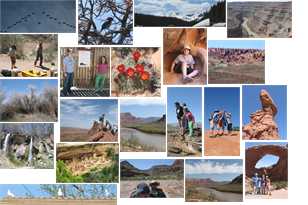
Figure 2: The result of 100,000 size equalization & tiling iterations
Before changing the resize method to ,
I reloaded the original file (to make the results more comparable), then
set 8 as the number of sizes to create and 4 as the ratio of largest to
smallest. After the same number of iterations, the results were as shown
in Figure 3:
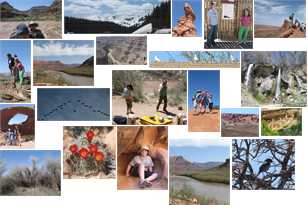
Figure 3: After 100,000 8/4 size distribution & tiling iterations
Both results had 85% coverage, up 25 points from the original, but there
are more differences than just equalized vs. distributed sizes.. The distributed
sizes do a better job filling the space horizontally between the margins
because, during the tiling iterations, Easel is more likely to locate
images that fit better at the end of each row. On the other hand, the
equalized sizes leave noticeably smaller gaps in between the images. Thus
they have equal amounts of white space, but it is distributed differently.
Just for the fun of it, I decided to see if one or the other was easier
to complete, i.e. manually adjust
to get rid of the remaining white space. As mentioned above, though, I
couldn't detect any difference: Easel's precision
alignment tool made short work of both.
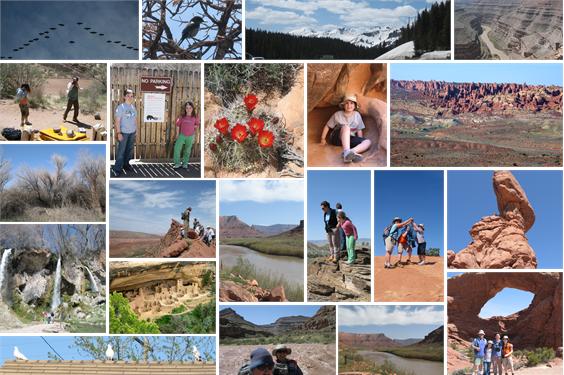
Figure 4: The equalized version after 10 minutes clean up with PAT.
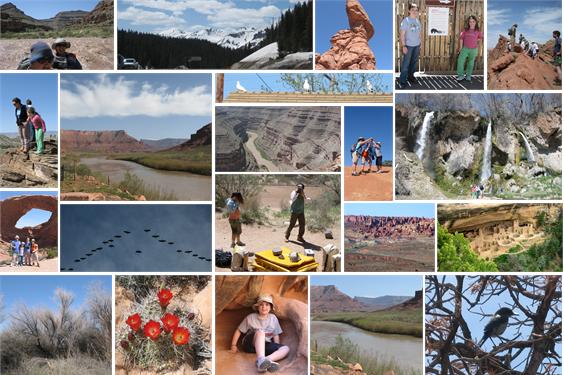
Figure 5: The distributed version, ditto.
The lesson here - I think - is that neither resizing method is inherently
superior. The greater variety of image sizes makes for a generally more
interesting composition, but giving all images equal weight may better
suit your purposes. You decide.