 Use the controls on the first tab to set text properties
such as the number of lines, text alignment, and font style, size and
color.
Use the controls on the first tab to set text properties
such as the number of lines, text alignment, and font style, size and
color.An Easel composition consists of some combination of images, captions, and frames. Captions, or text elements, come in a variety of flavors, from plain text to exploding balloons; samples are shown at the bottom of this topic. The appearance of any given caption is determined by its properties, set using the Caption Editor. Caption properties include the text, single-line versus multiline, text alignment, font style and size, colors, and borders.
For a quick intro to caption basics, see Adding, Editing, and Removing Captions. For a detailed discussion of caption properties, read on.
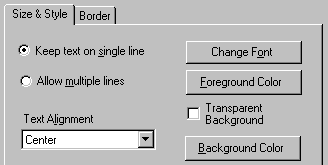
The caption editor appears whenever you first add a caption, and anytime thereafter when you right click a caption and select Edit Caption from the popup menu. Enter the text you want in the textbox labeled Caption Text to Display, then select one of the two tabbed pages below to set properties.
Use the controls on the first tab to set text properties
such as the number of lines, text alignment, and font style, size and
color.
The Foreground Color is the color that the text will be shown in.
When the Transparent Background box is checked, the Background Color button will disappear, because there will be no background color: the caption text will be superimposed on whatever is below it in the composition (unless you define a border, as discussed below).
When the Transparent Background box is not checked, the caption will be opaque, with the defined background color. If no border is defined, the background will be a rectangle.
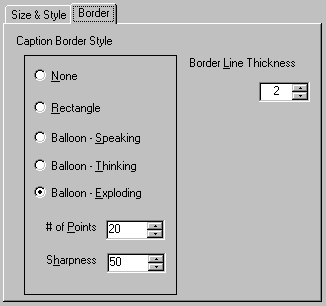 Caption borders can change simple text into eye-catching
graphic elements. They also let you -- literally -- put words in people's
mouths and thoughts in their heads with comic strip-style balloons.
Caption borders can change simple text into eye-catching
graphic elements. They also let you -- literally -- put words in people's
mouths and thoughts in their heads with comic strip-style balloons.
The size and shape of the bordered area is determined by the caption's rectangle. To change it, close the caption editor and drag the edges of this rectangle with the mouse.
Speaking and thinking balloons appear as identical opaque ovals until they are "attached," ie given the graphic element that connects them to the speaker/thinker.
The # of points and Sharpness controls only appear when Exploding Balloon is selected. These work identically to the settings for burst crops; see Burst Cropping for details.
The Transparent Background setting (see above) is overridden when a border is defined: the bordered area is always opaque.
To "attach" a balloon to a point in an image, close the caption editor and return to Easel's main window. When you right click on any caption that has an unattached border, the popup menu has an Attach Balloon item. To attach the balloon, select this menu item, then click the mouse at the desired point of attachment. When you right click on any caption that has an attached border, the popup menu has an Unattach Balloon item that gets rid of the attachment.
When you move a caption with an attached balloon, the attachment point moves also, which means that if it was in the right place to begin with, it will not be when you are done. If you want the attachment point to stay in the same place, begin the move normally but then press the Shift key before releasing the mouse button.
Caption Tip: If the precise size and location of your caption(s) is important, always use Print Preview before printing and inspect them carefully. It's been my experience that while frames and images reproduce exactly in print as they appear on the screen, text sometimes does not. You may need to adjust font size and caption location on-screen to get them to appear in print precisely as desired.