Using Online Photo Sites for Printing
A friend took one look at Easel and suggested that users would benefit
from easy access to the online photo sites (e.g.
kodakgallery shutterfly
snapfish), where poster sized prints
can be ordered at very reasonable cost (last time I checked, a 20x30 inch
poster cost ~$20). This was an excellent suggestion and I took it. Although
Easel has always been able to generate an image file that you could submit
to one of these sites, I made several changes to make the process more
straightforward and yield better results.
Step 1: Select the Online
Printer and Desired Page Size
On the Page Setup window, the
last entry on the list of available printers is . When
you select this, the list of available page sizes will expand to include
all standard large formats, including all that I found offered at online
photo sites in the US and the EU. Select
the print size that you intend to have printed online.
Step 2: Set Margins to 0, or Be Careful
In my experience, the online photo sites assume that you want a borderless
print, so that even if you submit an image with borders, they are likely
to enlarge and reposition it until the full page is covered. This
means that if the area inside the margins does not have the exact same
as the page itself, the print you get back will be missing part of the
image along one edge.
The easiest way to avoid this problem is to set the margins to zero.
However,
you may find (as I do) that it's a little easier to compose an image when
there is some white space around the edges, i.e.
margins are not set to zero.
Keep in
mind, however, that unless the page size you are using is a perfect square
(very unlikely), setting equal margins will change the image's aspect
ratio. For example, if you set 1/2" margins on a landscape-oriented
20"x30" page, the image becomes 19"x29" and the aspect
ratio changes from 1.5 to 1.53. This may not sound like much, but it will
result in a 20" x 30 1/2" image. That
1/2" will be chopped off along the short edge of the print, and believe
me, people will notice.
To avoid this problem, you need to set margins with the same ratio as
the page so that you shrink the longer dimension more than the shorter
dimension. For
a landscape 20x30, 3/4" for left and right and 1/2" for top
and bottom would work, as would 3/8" L/R and 1/4" T/B, and any
other pair of measurements with a ratio of 1.5:1
Step 3: Select Print
& Set Appropriate Resolution
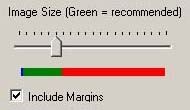
 When is selected,
commanding Easel to brings up the window with a slider control to
specify the resolution (in dots-per-inch, or DPI) of the image to be created.
Underneath
the slider is a color bar dividing the range into blue, green, and red
zones, which will vary in proportion depending on the native resolution
of the images in your composition and the size of the page. If all of
your images are high res and/or you've chosen a small page, for example,
there probably won't be a blue zone.
Settings in the blue zone, corresponding to resolution of 90 or fewer
DPI, will
create an image without sufficient resolution to create a good print of
the size you want. If
the whole range is blue, you will either have to settle for a lousy print
or exit printing and shrink the page a size or two, because your images
are too grainy to be blown up to the current size and still look good.
Settings in the red zone are overkill; they won't hurt the quality of
the print, but they produce a bloated file that in most cases won't look
any better than a smaller one. Increasing
resolution beyond 300 DPI is usually going to be a waste of bytes and
bandwidth.
So the green zone is generally where you want to be, though you should
still check to make sure that resolution is 150-300 DPI. If
you want to know more, such as why settings in the green zone don't guarantee
this, read More on Resolution
below.
Step 4: Mind Your Margins (Again)
If the current composition has margins set greater than zero, there
will be an check box underneath
the color bar, checked by default. If
you leave it checked, Easel will create an image that a) has corresponding
white borders around it, and b) is guaranteed to have the same aspect
ratio as the page size. If
you uncheck it, Easel will create an image corresponding to the area within
the borders with whatever aspect ratio it happens to be. If
you have margins set only for ease of composition and have maintained
the proper aspect (see Step 2 above), you should uncheck this box. Note
that if you have margins set because you want margins in the print, be
warned that the online photo site may ignore them.
Step 5: Select Image Format
Easel can save images in any of the formats supported by '
"Graphics Device Interface," though unless you have a good reason
not to, you should stick with JPEG, which is what most online photo sites
expect.
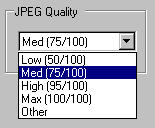
When JPEG is selected, you will also be presented with a setting. This determines the amount of compression used
by the JPEG algorithm to store the image. As quality goes down, file size
shrinks dramatically, even though it's hard to see much visible difference
at levels of 70 or more. I
tend to use 80-85, just to be on the safe side.
Step 6: Create the Image
When you have set resolution, margins, and format as desired, click
to create the image.
Step 7: Upload the Image File & Order Your Print
Once Easel has generated the image file, all you need to do is upload
it to the online site just as you would any other image file on your computer.
Note: Some sites have an "Upload
in High Resolution" (or words to that effect) option to select when
uploading an image for a large format print like a poster. Be
sure to select this when uploading --
if you don't, the site may undo all your hard work and shrink the file
to the resolution needed for a 4x6 print!
That pretty much covers what you need to know to prepare images for
printing online. However,
if you'd like to know more about the choices and graphics on the window, read on.
More on Resolution
Why doesn't Easel just let you select among standard resolutions? Why
the color zones? Why do they shift around? And
what are those funny gray boxes that appear in the preview as you increase
DPI?
An Easel composition is made up of multiple images, and even if they
all start out with the same resolution (e.g.
taken by the same digital camera at the same settings), the resizing and
cropping that goes on during composition means that they end up different;
some a little, some a lot. In
this sample 13"x19" composition, for example,
the resolutions range from a low of 80 DPI, where I took a very small
portion of an image and blew it up, to almost 700 DPI, where I used most
of the image but kept it small. The average (mean) resolution for the
62 images is 380 DPI. What
is the best way to deal with this kind of variation?
After giving it some thought, I decided that the best way was to make
the information available to help you -- the user -- make an informed
decision. Therefore:
The low end of the DPI range available with the
slider control is whichever is less, 90 or the lowest DPI in the composition.
90 DPI,
the minimal acceptable resolution for an online print, is the upper end
of the blue zone. Thus
if all images have resolution greater than 90 DPI, there will be no blue
zone. If
some images have resolution less than 90 DPI, the blue zone will extend
from the lowest resolution up to 90; for the sample, it runs from 80 to
90 and is barely visible.
The top end of the DPI range available with the
slider control is the highest
DPI image in the composition. If all images in the composition were 90
DPI or less, the whole range would fall in the blue zone, a suggestion
that you need to downsize the print. For our sample, however, the top
end will be set at 680 DPI. As noted above, you generally wouldn't want
to use such a high value for an online print, but it makes sense to make
available the highest resolution in the underlying images.
Finally, the green zone. The green zone runs from
90 DPI up to the average resolution of all images in the composition;
for the sample, 380 DPI. The logic for this endpoint is that there is
no point in creating an image in which a majority of the images have been
interpolated, i.e. blown up beyond
their native resolution and filled in. There's no intrinsic problem with
interpolation, and it makes sense to interpolate a few images in order
to match the higher resolution of others, but there's no point in doing
it to most of the images, especially since the online photo sites will
interpolate for you up to the limits of their equipment.
What about those grey boxes that show up in the in preview as you request
increased resolution? They show which images in your composition have
lower resolution than what you're asking for, and the darker they are,
the bigger the gap. Thus they provide an "interpolation map"
to help you arrive at an optimal setting for any particular composition.

 When Online Printer is selected,
commanding Easel to Print brings up the Create Image... window with a slider control to
specify the resolution (in dots-per-inch, or DPI) of the image to be created.
Underneath
the slider is a color bar dividing the range into blue, green, and red
zones, which will vary in proportion depending on the native resolution
of the images in your composition and the size of the page. If all of
your images are high res and/or you've chosen a small page, for example,
there probably won't be a blue zone.
